 skip to content


- How to make a PDF from PowerPoint, Publisher or Word
- Why doesn't my picture look good in print?
- Tips for taking photos for big prints
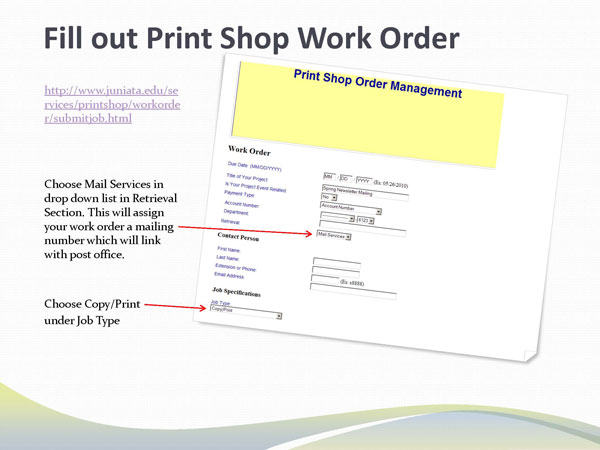
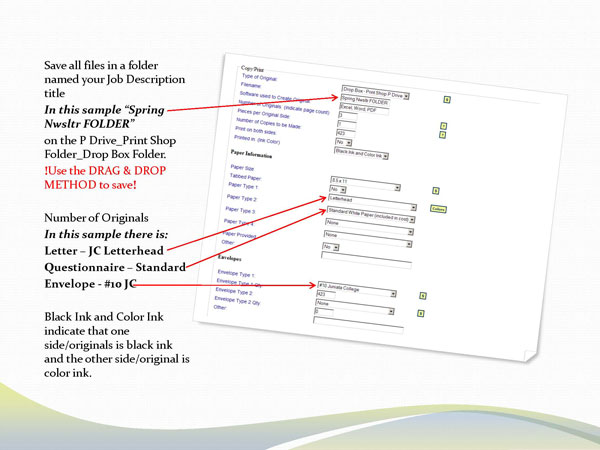
- How to submit a Work Order or Inventory Order
- How to submit a Mailing
- How to create a brochure so it will fold correctly
How to make a PDF
Why should you convert files to PDF?
Files don't always print the way they look on-screen. About 30% of files encounter problems when moved from one computer to another -- graphics disappear or misprint, text and labels shift position, Greek letters vanish.
The good news is that it's easy for you to convert files to a PDF before submitting. It's free, it doesn't take long, and it means you'll receive your job sooner.
PDF files print exactly as they appear on screen, but to ensure top quality, it's important to follow the instructions below. Also, please carefully check the quality of all your figures, etc. before submitting the file.
PowerPoint to PDF from Windows:
Click file Save As and choose PDF from the Save as type drop down list. Click SAVE.
If you don't see PDF in the drop down list, you’ll need either Adobe Acrobat (Pro or Standard) or Adobe Distiller. (The free Adobe Reader won’t work.) If you don’t have Acrobat, you can contact the College Help Desk and submit a work order to have the software loaded on your computer. The following instructions were developed with Windows 7 and Acrobat 9 Pro.
- From PowerPoint with your file open, choose File | Print. Choose “Adobe PDF” as the printer, and press the Printer Properties button.
- Under “Adobe PDF Settings” tab, choose “High Quality Print”, then press the Edit button.
- If you’re concerned about color accuracy, go under Color (on the left-hand side), click the drop down menu under “Color Management Policies” and choose “Convert all colors to CMYK” and “Relative colorimetric” in the drop down menu under “Document Rendering Intent”. This makes sure all colors are ones that can actually be reproduced on paper.
- Under Images (also on the left-hand side), set Downsampling to “Off” for all image types. This ensures no resolution will be lost from your figures and photos.
- Click OK, or save these settings under a new name for future use.
- Next you will need to choose/create the Page Size needed for your file. Choose your page size in the drop down list “Adobe PDF page size” (if listed) OR click ADD to create a new page size. Enter the Width and Height of your poster and type a “Paper Name”. Click Add/Modify. Your newly created paper size should now be listed in the drop down list (probably at the top).
- Say OK to Adobe setup, then click Properties to bring it up again. Sometimes it doesn't take the first time -- couldn't tell you why, though. Check to make sure the settings stuck, then click OK again.
- Click print to create your PDF. Proof carefully and submit the resulting file to the print shop.
Publisher to PDF from Windows:
Click file Save As and choose PDF from the Save as type drop down list. Click SAVE.
If you don't see PDF in the drop down list, you’ll need either Adobe Acrobat (Pro or Standard) or Adobe Distiller. (The free Adobe Reader won’t work.) If you don’t have Acrobat, you can contact the College Help Desk and submit a work order to have the software loaded on your computer. The following instructions were developed with Windows 7 and Acrobat 9 Pro.
- Saving a file to PDF from Microsoft Publisher
- From Publisher with your file open, choose File | Print. Choose “Adobe PDF” as the printer, and press the Printer Properties button.
- Under “Adobe PDF Settings” tab, choose “High Quality Print”, then press the Edit button.
- If you’re concerned about color accuracy, go under Color (on the left-hand side), click the drop down menu under “Color Management Policies” and choose “Convert all colors to CMYK” and “Relative colorimetric” in the drop down menu under “Document Rendering Intent”. This makes sure all colors are ones that can actually be reproduced on paper.
- Under Images (also on the left-hand side), set Downsampling to “Off” for all image types. This ensures no resolution will be lost from your figures and photos.
- Click OK, or save these settings under a new name for future use.
- Next you will need to choose/create the Page Size needed for your file. Choose your page size in the drop down list “Adobe PDF page size” (if listed) OR click ADD to create a new page size. Enter the Width and Height of your file and type a “Paper Name”. Click Add/Modify. Your newly created paper size should now be listed in the drop down list (probably at the top).
- Say OK to Adobe setup, then click Properties to bring it up again. Sometimes it doesn't take the first time -- couldn't tell you why, though. Check to make sure the settings stuck, then click OK again.
- Click print to create your PDF. Proof carefully and submit the resulting file to the print shop.
Word to PDF from Windows:
Click file Save As and choose PDF from the Save as type drop down list. Click SAVE.
If you don't see PDF in the drop down list, you’ll need either Adobe Acrobat (Pro or Standard) or Adobe Distiller. (The free Adobe Reader won’t work.) If you don’t have Acrobat, you can contact the College Help Desk and submit a work order to have the software loaded on your computer. The following instructions were developed with Windows 7 and Acrobat 9 Pro.
- From Word with your file open, choose File | Print. Choose “Adobe PDF” as the printer, and press the Printer Properties button.
- Under “Adobe PDF Settings” tab, choose “High Quality Print”, then press the Edit button.
- If you’re concerned about color accuracy, go under Color (on the left-hand side), click the drop down menu under “Color Management Policies” and choose “Convert all colors to CMYK” and “Relative colorimetric” in the drop down menu under “Document Rendering Intent”. This makes sure all colors are ones that can actually be reproduced on paper.
- Under Images (also on the left-hand side), set Downsampling to “Off” for all image types. This ensures no resolution will be lost from your figures and photos.
- Click OK, or save these settings under a new name for future use.
- Next you will need to choose/create the Page Size needed for your file. Choose your page size in the drop down list “Adobe PDF page size” (if listed) OR click ADD to create a new page size. Enter the Width and Height of your file and type a “Paper Name”. Click Add/Modify. Your newly created paper size should now be listed in the drop down list (probably at the top).
- Say OK to Adobe setup, then click Properties to bring it up again. Sometimes it doesn't take the first time -- couldn't tell you why, though. Check to make sure the settings stuck, then click OK again.
- Click print to create your PDF. Proof carefully and submit the resulting file to the print shop.
Tips for proofing your PDF file
Please proof your new PDF carefully before submitting! PowerPoint is famous for not printing things exactly as they appear on screen:
- Is the PDF file about the same size (number of bytes) as the original PowerPoint file? If it's less than half the size, check very carefully to make sure image quality wasn't degraded.
- Do any of your graphics look grainy or pixelated in the PDF? Even if they were OK in PowerPoint, they could have been degraded during the conversion. Zoom in on the PDF so each one fills the screen in turn; you can't judge image quality from the whole-poster overview. Make sure they were at least 150 dpi to start with and that you turned off image downsampling (see above).
- Do your graphics look the way they're supposed to? Problems with embedded Visio drawings, Excel charts, etc can often be solved by converting them to images.
- If you used Greek letters, did they print correctly? "Symbol" font is usually a safe choice.
- Is any of your text clipped or obscured? Try making sure PowerPoint text boxes are no larger than the text they contain, and don't max out slide size (56").
- Is your text positioned correctly with respect to other page elements, like box borders and chart axes?
- Does the poster have big white margins? Set printing margins to 0 or use Acrobat's Document | Crop Pages | Remove White Margins tool.
Why doesn't my picture look good when I print?
You took a picture of a toddler on your cell phone and have shown it to all your family and friends. It’s good enough to enter a photo contest and you would like to print some for everyone’s living room. But when you print the 8 x 10, it doesn’t look so great. The white areas look like the printer quit working there. His cute little outfit looks like a bunch of stairs …
You work hard creating a poster for your club’s event. Everything is just the way you want it. You email a proof to some of the other officers of the club and everyone loves it. But when you get the finished product, the pictures look blurry and jaggy. You and the club members are very disappointed.
Why do these scenerios happen? Everything looked great on screen, so why not when it was printed? RESOLUTION is the determining factor between stair-like, jaggy looking printed pictures and sharp, crisp printing. Most of us don’t even consider resolution – if it looks good on screen we assume it will print that way.
Pictures are made up of pixels, and the number of pixels per inch is resolution, described as “ppi”. Imagine a square-filled mosaic of a circle and each square tile used to make it equals one pixel. When you look at it far away it looks like a circle, but the closer you get the bigger the tiles appear and the more the “circle” starts looking like circular stairs. That’s what happens when low resolution images are enlarged too much – printing the picture bigger than it should be.
Where do low resolution images come from? Most of them come from smart phones, the web, or from cameras that are set to take higher resolution photos. Typically images on the web are about 72 ppi which matches the resolution of many monitors and helps web pages load fast. They look fine on the screen. Your smart phone may take high quality pictures but when shared can be lowered in quality. This can happen on a traditional digital camera too if it’s set so the most pictures possible will fit on the SIM card. This result is low ppi images. Set your camera for high quality images and get another SIM card!
What can be done if all you have is a low resolution picture? Either print it small or use software to intelligently enlarge it for better quality. Adobe PhotoShop can improve the resolution based on the type of image to be enlarged. Another possibility is a free online service PicMonkey® - http://www.picmonkey.com – use the “resize” option.
A quick check to find the maximum print size when printing pictures is to check the file size. Here is a list of file sizes for .jpg files that can be useful when judging if a picture can be printed at a standard size. Most cameras can save images as .JPG (jpeg) files. In general, files should be at least this size in kilobytes to reproduce acceptably:
5 x 7 inches – 1500 x 2100 pixels, about 668 kb
8 x 10 inches – 2000 x 2500 pixels, about 791 kb
11 x 14 inches – 2200 x 2800 pixels, about 806 kb
11 x 17 inches – 2200 x 3400 pixels, about 946 kb
(JPG file sizes increase when opened/decompressed)
Tips for taking photos for big prints.
Many of us are using our smart phones as cameras. Are the pictures good enough to use for big prints?
Good news - several smart phones are at or near 8 megapixels, which will be enough for a nice large print. Of course a digital camera is usually even higher resolution than a smart phone and your best choice for good originals. If you are using a digital camera, set it for the highest quality/largest file size. This will result in the most resolution for large prints.
Pixel density and resolution of photos determine what size they can be reproduced and still preserve quality. If you are unsure, you can email your image to printshop@juniata.edu and we will check to see if it is printable.
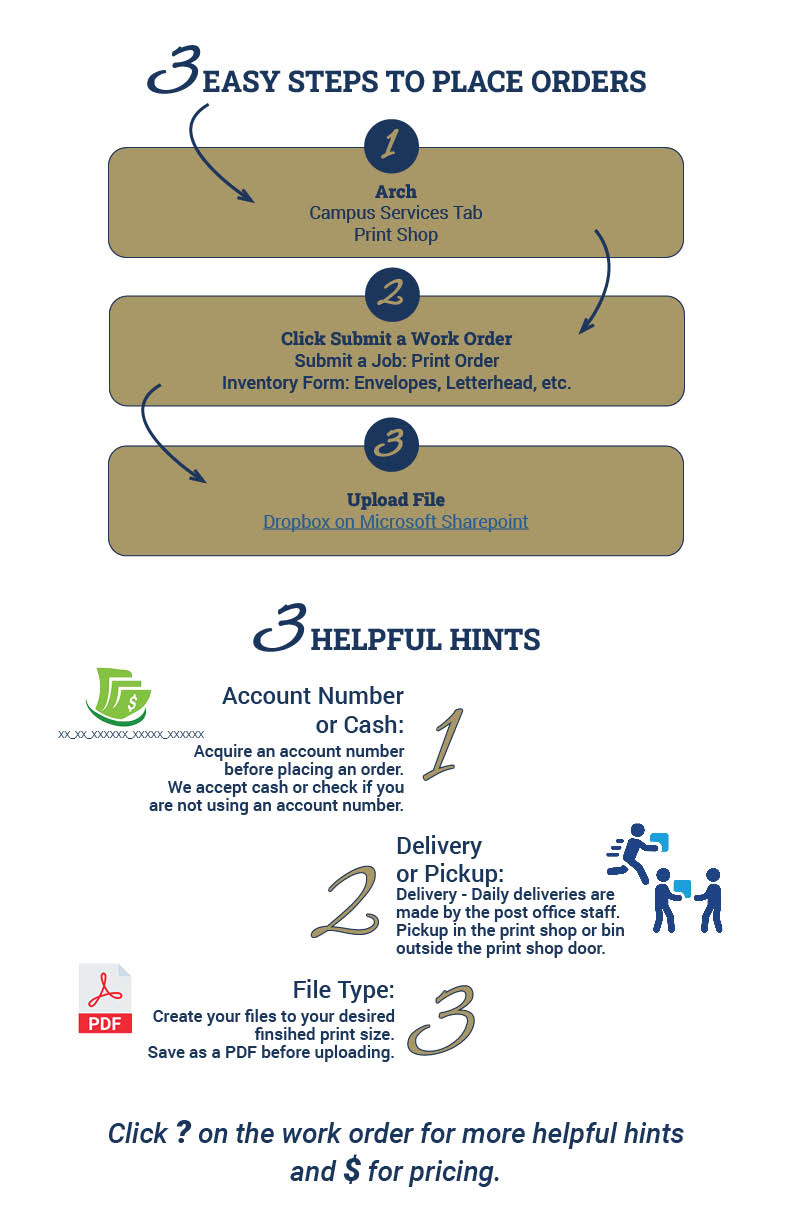
How to submit a Work Order or Inventory Order
How to submit a Mailing
Preparing a mailing for your department
When preparing a mailing you have the option of using one of two different postage
permits (often called an indicia), providing your mailing meets all the criteria indicated below.
Any mail using the Juniata College Permits MUST be processed through the Juniata College
print shop and campus post office.
****NO INTERNATIONAL ADDRESSES ARE ACCEPTED WITH THE USE OF THESE PERMITS****
REQUIRED CRITERIA for BULK MAILING:
- Your mailing must total a MINIMUM of 200 pieces.
- All mailing pieces must be IDENTICAL in size, weight, and number of enclosures as well as the content.
- The mail piece must contain the complete Juniata College return address (1700 Moore St, Huntingdon PA 16652).
- The mail piece must contain the complete address of the addressee (recipient).
- Exact count must be indicated to the campus post office in order to process.
- Envelopes can be unsealed with flap down OR sealed, however DO NOT mix sealed and unsealed envelopes.
- Permit imprint and barcoding will be applied by the print shop.
WARNING! We have noticed that bulk mail is traveling through the system at a much faster rate than previous years because we are imprinting Intelligent Mail bar coding on the envelopes. However, bulk rate mailings do take longer to reach recipients. USPS sites can allow BULK mailings to remain on site for up to 3-weeks.
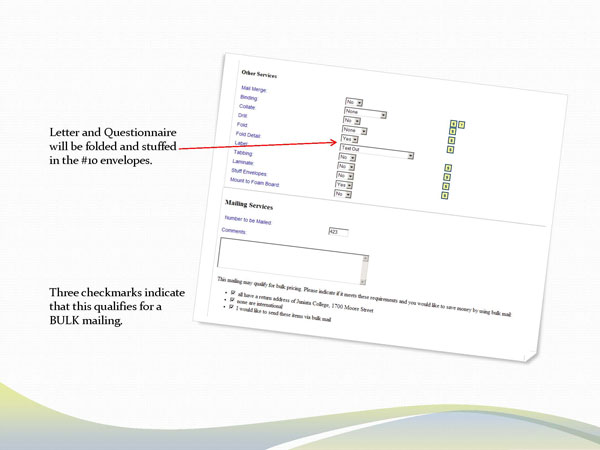
Example of postage savings: A quantity of 425 #10 JC Envelopes enclosed with a letter printed on JC Letterhead has a savings of $119.02. If you do not use the college print shop/post office, the postage costs would be $187.00 (that’s the first-class rate .44 cents each).
Start your project early to SAVE money. It WILL be worth it!
REQUIRED CRITERIA for FIRST-CLASS MAILING:
- Your mailing must total a MINIMUM of 500 pieces.
- All mailing pieces must be IDENTICAL in size, weight, and number of enclosures as well as the content.
- The mail piece must contain the complete Juniata College return address (Juniata College, Department Name, 1700 Moore St, Huntingdon PA 16652).
- Exact count must be indicated to the campus post office in order to process.
- Permit imprint and barcoding will be applied by the print shop.
Note: Mail using the First Class Permit travels at the same rate as all First Class mail. The postage depends on the characteristics of your mail piece. Mail pieces must weigh less than 13 ounces.
Example of postage savings: A quantity of 587 8.5 x 5.5 postcards has a savings of $35.99. If you do not use the college print shop/post office, the postage costs would be $256.52 (that’s the first-class rate .44 cents each).
FIRST-CLASS MAIL:
If neither of the above options fit your needs, your mail pieces will go as FIRST-CLASS mail.
- Your mailing can have any quantity (each piece will be metered with first-class postage).
- Metered at the College post office with the current first-class rate.
Envelopes – In a tray or box, place letter-sized envelopes, unsealed, with the flaps down. The envelopes will be sealed as they are processed through the postage meter. Envelopes should be sealed OR unsealed, however DO NOT mix sealed and unsealed envelopes. Large, bulky envelopes with end-openings or small invitation sized envelopes with square flaps (i.e. A-6 envelope) MUST be sealed by the department. Such envelopes cannot be sealed by machine. Envelopes smaller than 3 ½ x 5 will NOT be accepted.
Cards - Cards smaller than 3 ½ x 5 will NOT be accepted.
Instructions for submitting a mailing to the print shop:
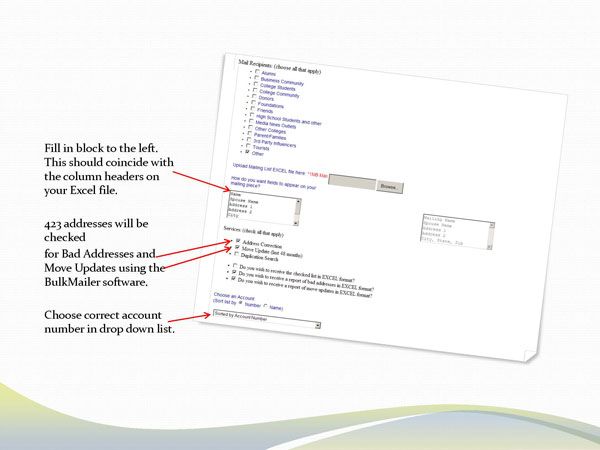
Compile an Excel file of addresses
- Columns MUST have headers
for example:
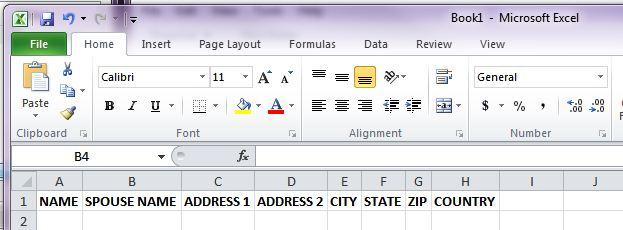
- City, State and Zip MUST be in different columns
- NO double-spacing within a row
How to create a brochure so it will fold correctly
Brochures are one of the best ways to explain products and services to your customers and be a great marketing tool for your business, office or club.
We can produce them with quality paper and printing. And a quick turnaround time.
Here are the standard folded sizes in inches:
Letter size folded to half-letter. 5.5 x 8.5
Letter size folded to 3-panels. 8.5 x 3.65
Legal size folded to 3-panels. 8.5 x 4.65
Legal size folded to 4-panels 8.5 x 3.5
Tabloid size folded in half, then in 3-panels for a total of 6 panels. 8.5 x 3.65
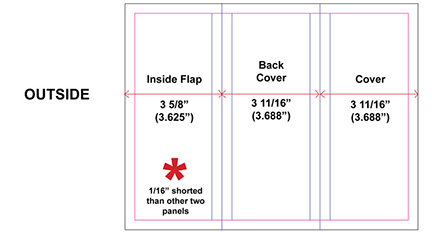
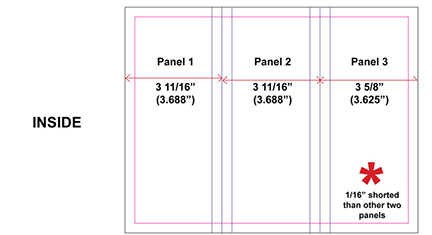
Here are the panel measurements for a letter size brochure:
Here are a few common folds:
Typical Paper Weights and Finishes are:
20# Copy Paper
70# and 80# Cougar Text
80# and 100# Gloss Text